| The Original
Official Guide by Sefy Levy |
| More
Guides: |
| DVDx / VirtualDub+LSX / AVI to VCD / DVD2SVCD / ImTOO DVD Ripper / EasyDivX / Complete Guide |
|
Introduction!
In this guide, I will attempt to make it as easy as possible
to
explain how to create a Backup of your DVD movie, This version of the
guide is updated to the latest programs and will guide you from Start
to
Finish in one go! using the most common and freeware programs! and also
included is Chaptering, do remember MOST of the settings used here are
DEFAULT, I did not make any changes, and if I did have, they are
mentioned in the guide. as I have recently recieved some feedback and
suggestions on this guide, I will continue to work on it, but for now,
the All-In-One/Ultimate Guide will be on halt.
|
|
Programs
used in this guide:
Copying
- Smart Ripper
FrameServing
-
DVD2AVI
Encoding - TMPGEnc
or TMPGEnc Plus
Chapters
- Chapter-X-Tractor
Authoring - VCDEasy ( & ASPI Layer for
your system! - use the search for "WinASPI" or scrool to the bottom
of the page!)
|
|
Before we start with the guide, we must make sure the tools we
are
going to use actually work and setup correctly! Unzip the tools
you are going to be working with into the SAME folder, and
once you do, make sure all applications work, and then we are
ready to begin! For this example i've used "Superman - The Movie
Special Edition" (NTSC/154min/DD51@384k) and we will be converting it
to a Video-CD NTSC Standard so it will fit on two 80min CDR
media. (or 74min with 2min Overburning, which is only if your CDRW
drive and media supports it!), do remember that 740mb filesize
will fit into 74min CDR and 800mb Filesize will fit into a 80min CDR
(in VCD 1min = 10mb!).
NOTE:
This current guide does NOT support Subtitles, if you want subtitles in
your movie I suggest you use one of the other great guides on VCDhelp,
in the future, if there is an easy method of adding subtitles, I will
add them to this guide! |
|
|
This
guide
will be divided into the following sections:
Part 1 - Copying
Part 2
- FrameServing
Part 3
- Encoding
Part 4 -
Chapters
Part 5
- Authoring
Part 6 -
Burning
Part 7 - Troubleshooting
|
|
| =========================================================================================== |
|
| Smart
Ripper |
|
| The most updated
program, the most prefered one I believe as well,
has the most options, and the easiest to use interface amongst all
other programs (well, atleast in my opinion) and rarely fails on
copying a movie. |
|
|
Settings
Step - Make Sure your settings are identical to the ones in
the image below.

|
|
|
Step
1 - Press on the
small browser button under the Target, and Choose a Target directory
that the movie files will be placed.

|
|
|
Step
2 -
After you succesfuly selected a Target Direcory, the "Start "
button will appear, from the "Rip-Method" press the " Movie
" and then press the "Start" button.

|
|
|
Step
3
- As soon as you press the Start button, the copying will begin, with
alot of details regarding the time, encryption and DVD Speed.

|
|
| =========================================================================================== |
|
| DVD2AVI |
|
| This program
basicly makes it possible for TMPGEnc to read the VOB
files since TMPGEnc can only load one VOB file a time it does not
seem to be able to read them all at once directly, it also gives you
the ability to select which Audio Track you want the movie to have and
create the appropriate WAV file for it. ( NOTE: The MP3 Option NO LONGER exists in
the new versions of DVD2AVI! ) |
|
|
Step
1 -
Press "File" and "Open" (1a), Select the first VOB file
of the movie (1b), and This will automaticly select all the
VOB's that follow (1c).
1a
) 1b ) 1b )
1c
)
|
|
|
Step 1d - This is an Optional Step! - Some movies may
come in
the Film format which is 23.976 fps instead of the regular NTSC 29.976,
so you might want to enable the Force Film feature of DVD2AVI, go to
the " Video" menu and select "Field Operation" and then
press on the "Forced FILM" and this will create a D2V file
using 23.976 fps.

|
|
|
Steps 1e/1f - Go to the "Audio" menu and select "
Track Number" and then select which track from the Movie you
want to create as a WAV (most movies have the English Track on the
Track 1). Click again on the "Audio"
menu and select "Output Method"
and make sure you are selecting "Decode
to WAV (AC3, LPCM)" option, so it will create a usable WAV file
for TMPGEnc and not AC3 track!
1e) 1f) 1f) 
|
|
|
Steps 1g/1h - This is an Optional Step! - Press the "Audio"
menu and select the "Dolby Digital Decode" and choose if you
want to create a "Dolby Surround Downmix", some users report
better sound quality and surround with this option enabled. Also you
can
have DVD2AVI convert the 48Khz Audio Sample into a 44.1Khz, by
selecting
the "48 -> 44.1KHz" submenu,
and selecting how high quality you want the convertion to be. ( NOTE: This takes alot
more processing time and slows down the creation of files, and also
creates a lower quality WAV file, so I recommand you AVOID using this
option! )
1g)
1h) 
|
|
|
Step
2a/2b/2c - Press "File" and select "Save Project "
( 2a), a popup window will appear, here you will input the
filename ( 2b) this part takes awhile, so when you see in
Status near Remain: FINISH, you are done (2c), next you will
check that all the files needed for TMPGenc are present, the VOB,
D2V & WAV (2d).
2a
)
2b
) 2c) 2c)
|
|
|
Step 2d - If you managed to follow all instructions
correctly,
you should now have a WAV file and a D2V file in your VOB's folder.
(* NOTE: Do NOT delete the VOB files! they are still required for
the encoding! *)
2d)
|
|
| =========================================================================================== |
|
| TMPGEnc - Wizard
(v2.5x +) |
|
In the Latest
version of TMPGEnc there has been a new feature
added to ease up the usage for Newbie's, it's a Wizard mode, which
helps you through each step you take in an easier to use way,
here I will guide you through the Wizard Steps.
|
|
|
Step
1
- Open TMPGEnc and use the Wizard to select the Template of your choice
according to the Movie you are encoding, if the Wizard has been
previously disabled, you can press CTRL-W to activate it again,
for this movie i've selected the "Video-CD NTSC" Template,
press the "Next " button to continue.

|
|
|
Step 2 - On this step use the "Browse" button to
select
the "Video File" (2a) and "Audio File" (2b
)
inputs for your movie, when you are done, you will have
the option for setting the "Video Type" and the "Field
order " and also the "Aspect ratio" according to your
Source,
remember, this is where you set if your DVD is in a Wide Screen format
or Full Screen, and then press "Next " to continue.

2a
)
2b
)
|
|
|
Step
3
- Here you can use the "Source Range" (3a) to encode just
part of your movie or optimize your movie using the " Clip frame
" or "Noise reduction", those are optional tools ,you dont HAVE
to use them, only use them when you know what you are doing.

|
|
3a)
Press on the "Settings" button next to the "Source Range
", and select the Start and End frames for the first part of the
movie, notice at the top left corner, there is both the amount of
frames and the running time "136459 frame (01:15:53) " so
just scroll around your movie till you get to the point were you
want to cut.
Remember: if you are doing a Video-CD you CAN fit 74min of movie
into a 74min CDR, even if the file size is 740mb, it is normal and
will fit! and the same goes for 80min movie for 80min CDR media!

|
|
|
Step
4a
- Select the type of CDR/DVDR media you will be using for TMPGEnc to
calculate if the file will fit into that desired media type, when
using the default Standard Templates, you cannot alter the settings
unless you go into the "Expert" settings, however, if you
choose a self-made template or other then those that came with TMPGEnc,
you can change it directly in this screen.

|
|
|
Step
4b
- If you pressed on the Expert button on the previous step, it will
take
you to this screen which allows you to define all the settings you
want, what you see below is what I have set for my movie which
is a Wide Screen 16:9 display and i've kept the aspect ratio so the
resulting VCD will come out as a Wide Screen and will not be
stretched out of proportions and it will contain the Black Bars
on the top and bottom!.
NOTE: TMPGEnc controls how the movie will appear on your
TV
set, either in Wide Screen or Full Screen, to accomplish that, follow
these settings according to your movie, you need to go to the Settings
/
Advanced, and change the followings:
If your movie is Wide Screen:
Source aspect = 16:9 Display
Video arrange method = Full Screen (keep aspect ratio 2)
If your movie is Full Screen:
Source aspect = 4:3 Display
Video arrange method = Full Screen (keep aspect ratio 2)
4b)
|
|
|
Step
5a
- Now select the "Output file" name, if you used the "Source
Range", make sure you select diffrent file name
for each part of the movie, and it would also be easier to
select "Create another project..." so you can let TMPGEnc
work on both parts of the movie in one go instead of waiting for
one part to finish and then repeating it again.

|
|
| Step 5b
- If you have selected to create another project, you will have to
repeat all the Wizard Steps you went through till now, but the
diffrence is you select a diffrent start/end in the "Source Range
", and select the "Output file" name for the second part, make
sure you select diffrent file name for each part of the movie! and
remember to select "Start encoding immediately" or it will
attempt to create another project!.

|
|
|
Step
6
- Once you pressed the "OK" button, the encoding will start,
when
it's done with Part one, it will go automaticly for Part 2.

|
|
| =========================================================================================== |
|
| Chapter-X-Tractor |
|
This program is
capable of accessing the DVD Movie's IFO file and
extracting the Chapters Information so it will be used in to create a
VCD/SVCD with the same Chapter Points, so when you use the Remote
Control you can jump from chapter to chapter.
|
|
| Step 1a -
Load Chapter-X-Tractor (1a) and press the "
Open IFO" button.

|
|
|
Step
1b
- Select the Movie IFO file which you ripped earlier.

|
|
|
Step
2a
- You will now see all the information needed in the " RAW Data"
field.

|
|
|
Step
2b
- Now Press the "Save data" button, and select a filename
for the Chapter Information.

|
|
| =========================================================================================== |
|
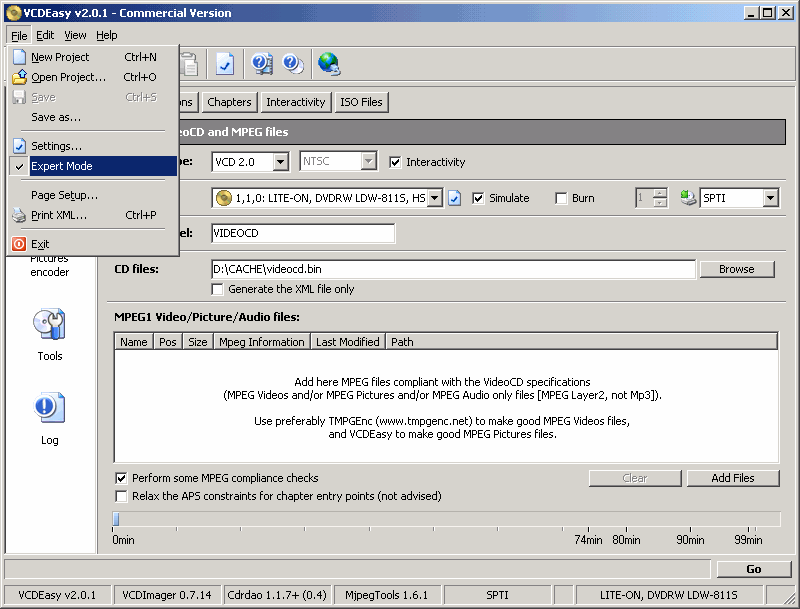
| VCDEasy |
A New program that is capable of
doing chapters in a rather easy and
simple way, and uses all the free tools out there for giving you the
best of the best, it's chaptering capabilities are far simple but
effective in the last few builds it has added support for the free
CDRDao burning tool, and gives you an easy interface for burning
the images it created.
|
|
|
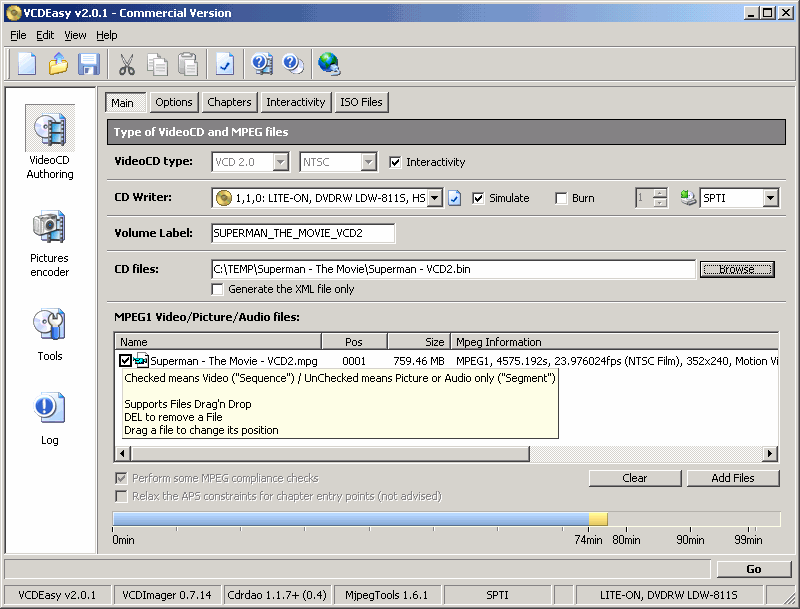
Step
1a
- Open VCDEasy, and set everything according to your specific movie,
and
follow the example below.
( *
NOTE:
Please do not create blank spaces in the Cue/Bin name, as CDRDao may
have a problem burning it later on.*)
|
|
|
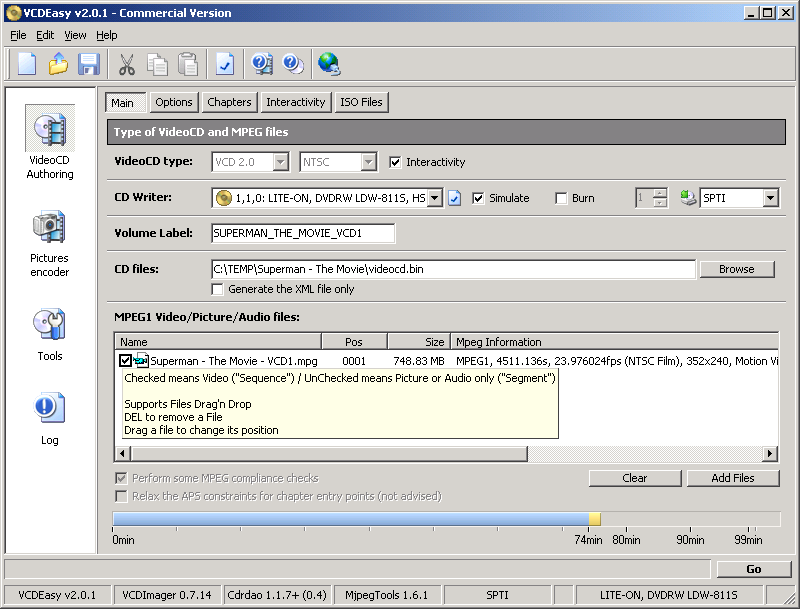
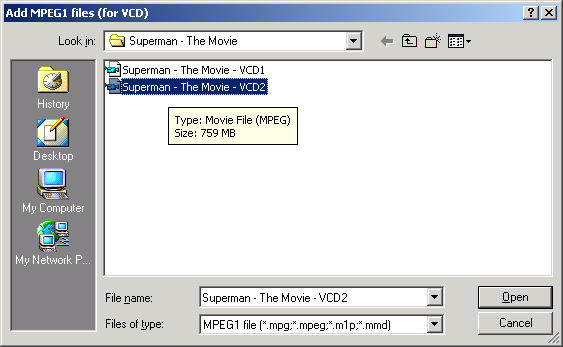
Step 1b - Press the "Add Files" button and
select the
first of the two files you encoded earlier.

|
|
|
Step 1c - Change the "Volume Label" to reflect
the name
of the Movie, and also select the "Bin Output File"
location.
|
|
|
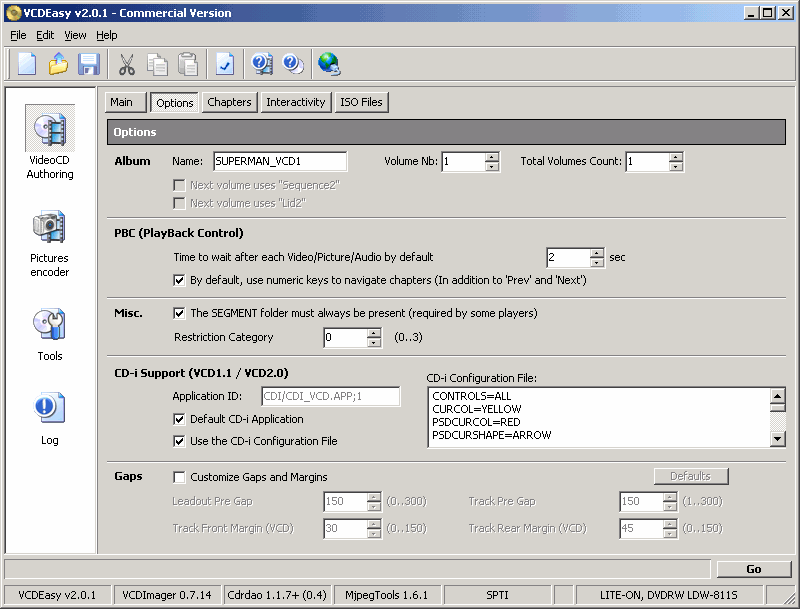
Step 2 - On the "Options" tab you can write down
the
name of the "Album" and also enable the "Use Playback Control
(PBC)".
|
|
|
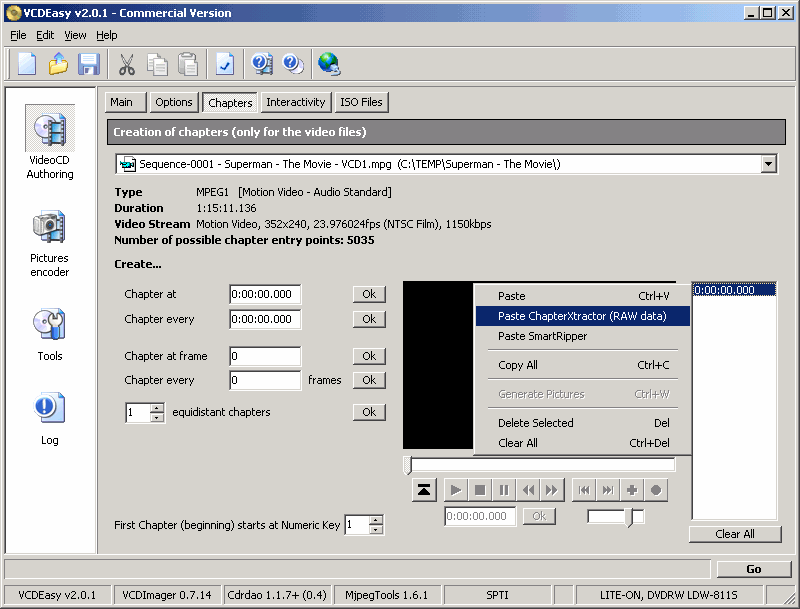
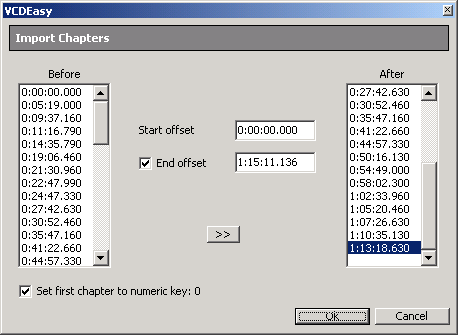
Step 3a - Press the "Chapters" menu item and
Here you
can select to import the Chapters for your movie, Right Click
to
get the popup menu so you can import from Smart Ripper or
Chapter-X-Tractor.
|
|
|
Step 3b - Select the "Start offset" and "End
offset
" for the first part of the movie and press the "Ok" button.
|
|
|
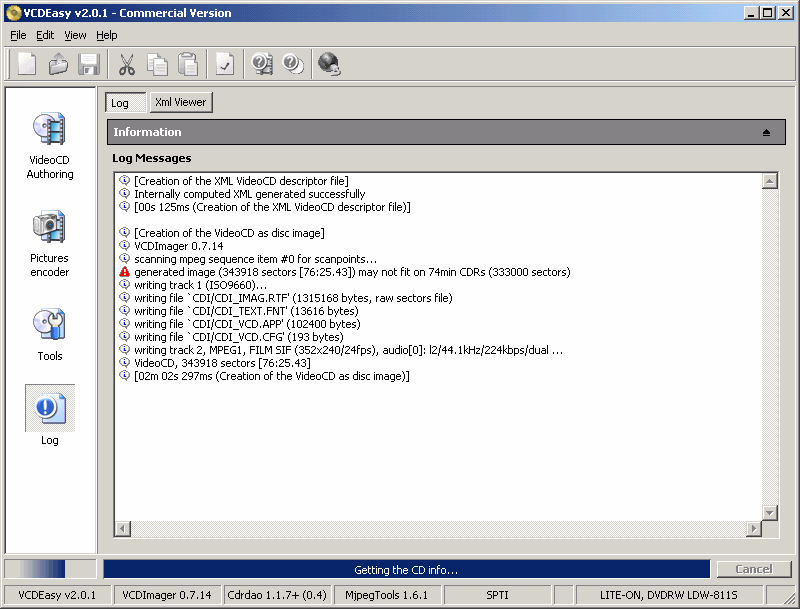
Step 4 - Press the "Go" button, VCDEasy will
begin
analysing your MPG file and create an Image file for burning.

|
|
| Step 5a - Go back to "Main"
by pressing the "(S)VCD "
button, remove the MPG file, and open the second part of the movie.
|
|
|
Step 5b - Change the name of the "Bin Output File",
so
you don't accidently overwrite the previous file (if you didn't
burn it yet).
|
|
|
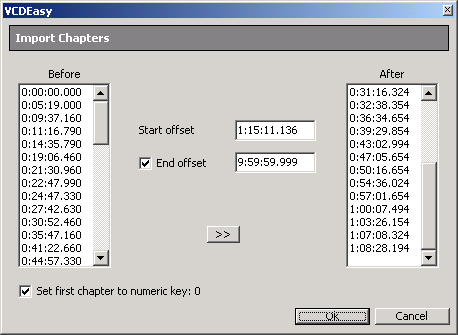
Step 5c - As in Step 3a and 3b, select
the
Chapters for the second part of the movie, make sure to start a
Chapter after the one you last selected on the previous part (3b),
and when you are done press the "Ok" button.
|
|
|
Step 6 - Press the "Go" button again to create
the
second image file of the movie.
|
|
| =========================================================================================== |
|
| VCDEasy / CDRDao |
|
VCDEasy comes with CDRDao which
enables it to burn Bin/Cue images, this way, you do not require any
additional software to burn your images.
|
|
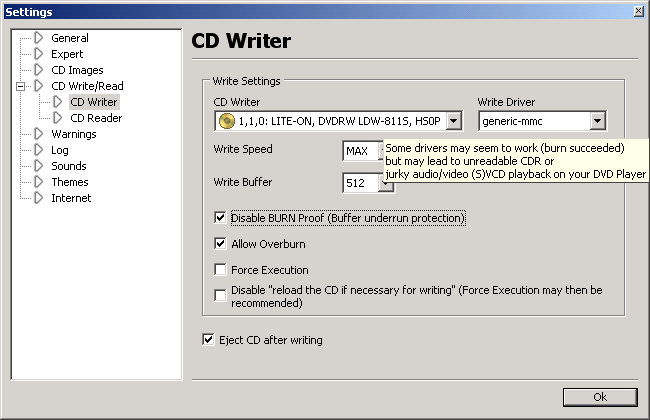
| Step 1 - To burn the
newely created images, first make
sure that the CDRDo is set up correctly, go to the "Settings "
and select the "CDRDAO" menu item, make sure you select your "
CD Writer" and set the speed, and also enable the "Allow Overburn
" if you plan on using over 80min CDR media.
|
|
|
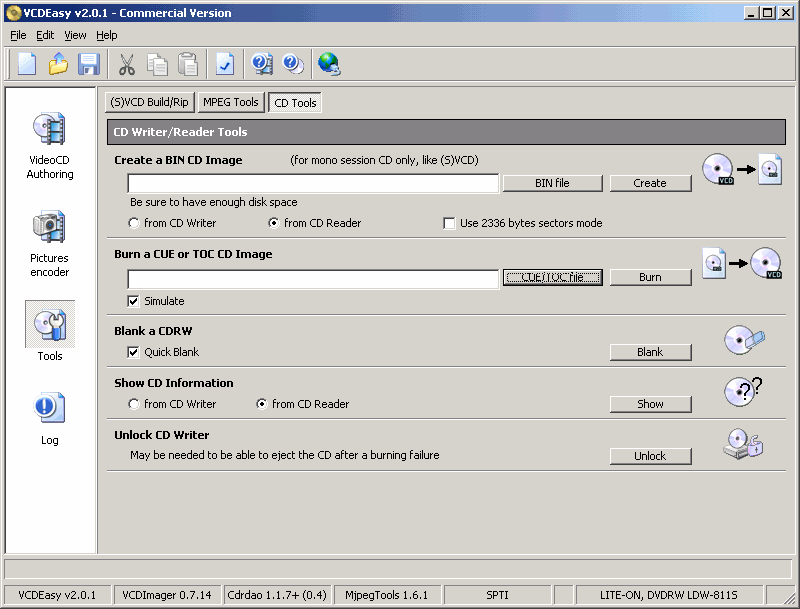
Step 2 - Next, go to the "Tools" section and
select "CDRDao
Tools" from the above menu, here you can "Blank a CDRW " and
also select to "Burn a CUE or TOC CD Image" file, you can also
select to "Simulate" and not actually burn. Press
the " CUE/TOC file" button, and then select the Image you want
to burn.
|
|
|
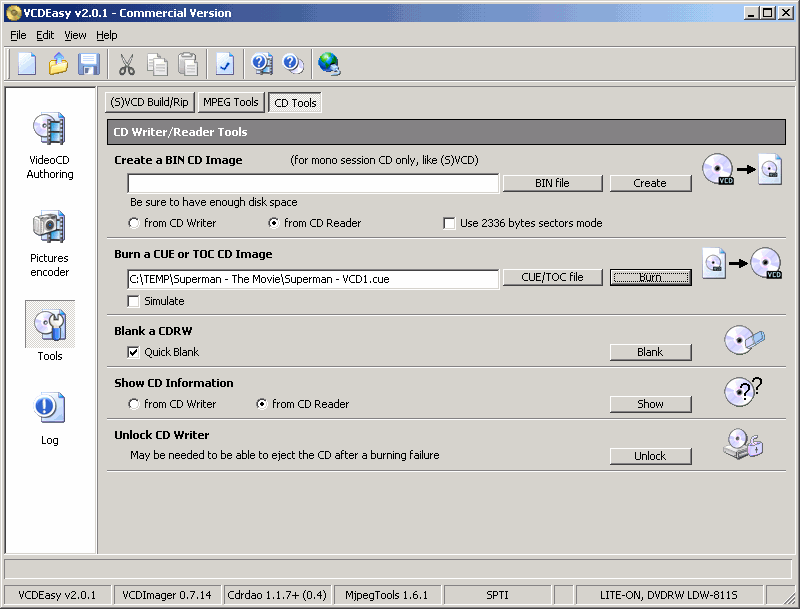
Step 3a - After you selected the first image of the
movie (in
this case Superman - VCD1.cue) then press the "Burn"
button and the writing of the CD will start.
|
|
|
Step 3b - When you are done burning the first part
select the
second image of the movie (in this case Superman - VCD2.cue)
and again press the "Burn" button and the writing of the CD
will start.

|
|
| THE END |
|
| =========================================================================================== |
| Troubleshooting |
|
| Here I will try to cover all the
problems you may encounter, and
hopefully help you fix them. |
|
- In
Order for TMPGEnc to recognise D2V files, you MUST have the VFAPI and the DVD2AVI.VFP
file located where the TMPGEnc.EXE file is! it will NOT work any
other way! It is also sometimes helps to use the Forced Film option in
DVD2AVI, but only if you are still unable to open the D2V files with
TMPGEnc. (suggsted by msfox)
- In
some DVD movies the Audio Track is located on the second track,
so you might want to try in DVD2AVI to rip the secondary Audio Track,
if you are not sure which Audio Track to choose, open the
Chapter-X-Tractor text file and you can check in there.
- Also
in some movies the Audio Track is a DTS and DVD2AVI is
incapable of handling it and converting it to WAV, I would recommand
you find a diffrent track, there is usually both DTS and AC3
tracks, use the information files by either Smart Ripper or
Chapter-X-Tractor to find out if your movie has an AC3 track and if
does, then on which track it is, and if there isn't find the next
best alternative which would be the 2ch track.
- Make
sure when you encode the movie that the currect Template will
be used for your movie, an incorrect Template will cause A/V sync!
and not to mention the resolution will be distorted (if you use PAL on
NTSC and NTSC on PAL).
- If
you are having problems copying the Movie VOB files to your
HDD, I suggest you check your ASPI Layer, the ASPI that comes with
Windows9x, Millenium are not good for ripping, update them, and
Windows2000/XP does not come with an ASPI Layer at all! make sure
you download the latest ASPI for your system, you can get the v4.6 for 98/Me/2000XP
here! (scrool to the
bottom of the page!)
- If Smart Ripper or any other of the DVD Copying programs
are unable to access your DVD Movie, try to first play the disc using
any Software DVD Player, and then try to run the ripper.
- Because
the Copying program always selects as default the longest
running title of the DVD, it might select the wrong title, So make
sure the VOB's that were copied are indeed the VOB that belong to
the movie itself and not the Extra features (e.g. Pearl Harbor).
|
|
Copyright 2000-2004 by Sefy Levy, All
Rights Reserved.
|
|
Best Regards,
Sefy Levy,
Certified Computer Technician. |